The following sections cover:
- Creating a new Public Folder database
- Creating and removing Public Folders
- Mail-enabling Public Folders
- Configuring Public Folder database settings
- Configuring Public Folder settings
Creating a New Public Folder Database
To accomplish the creation of a new Public Folder database, perform the following:
1. | Open the EMC.
|
2. | From the Navigation Tree, expand the Server Configuration work center and click Mailbox.
|
3. | From the Result pane, choose the server on which you want to create a new Public Folder database.
|
4. | From the Work pane, choose the storage group in which you want to create the new Public Folder database.
|
5. | From
the Actions pane (or by right-clicking the storage group), click New
Public Folder Database. The New Public Folder Database Wizard displays.
|
6. | Type the name of the new Public Folder database in the Public Folder Database Name box.
|
7. | You
can specify the location of the Public Folder database files by
clicking Browse, and then entering the path for the Exchange database
file (.edb) for the Public Folder. (This is optional.)
|
8. | Leave the Mount This Database option selected.
|
9. | Click New, and after the database is created, the Completion page displays.
|
PS Note
The
cmdlet through the EMS used to create a new Public Folder database is
New-PublicFolderDatabase -Name "Name of Database" -StorageGroup "Name
of Storage Group".
Creating and Removing Public Folders
Creating
and removing Public Folders initially could be done only through the
Outlook client (if a person had the correct permissions) or through the
EMS. There was no GUI for working with Public Folders beyond the
creation of the database itself. That has changed with the inclusion of
the Public Folder Management Console tool found in the Toolbox options.
To create Public Folders from within SP1, perform the following:
1. | Open the EMC.
|
2. | From
the Navigation Tree, expand the Toolbox work center, and from the
Result pane, select Public Folder Management Console. You can
double-click the tool or choose Open Tool from the Actions pane.
|
3. | The SP1-added Public Folder Management Console displays separately from the EMC.
|
4. | Select Default Public Folders, and you might note that there are currently no folders in your system.
|
5. | Click New Public Folder, and the wizard begins.
|
6. | All you are asked for is a name. Provide a name and click New.
|
7. | After the folder is created, you are shown the Completion screen and a green circle. Click Finish.
|
To
remove a Public Folder, you need to select it and choose Remove from
the Actions pane. A warning displays and you need to confirm that you
wish to remove it.
PS Note
The cmdlet through the EMS used to create a new Public Folder is New-PublicFolder -Name "Name of Folder". You can also place a new Public Folder in other folders that are already in place using the -Path parameter. So, if you want to place a folder named Research within a folder named Legal, type New-Public Folder -Name "Research" -Path \Legal -Server "ServerName".
Mail-Enabling and Disabling Public Folders
By
default, public folders do not receive email until you mail-enable
them. They can receive posts from persons that have permission in the
company, but not emails. To mail-enable a public folder, perform the
following steps:
1. | Open the EMC.
|
2. | From
the Navigation Tree, expand the Toolbox work center and from the Result
pane, select Public Folder Management Console. You can double-click the
tool or choose Open Tool from the Actions pane.
|
3. | In the Navigation Tree of the Public Folder tool, expand Default Public Folders.
|
4. | Find the folder you want to mail-enable. Then right-click on it or look in the Actions pane for the Mail Enable option.
|
5. | You
should note that the icon for the Public Folder changes. Now a small
letter is shown next to the folder (whereas ordinarily it is inside the
folder).
|
6. | To disable the folder, select it again and choose Mail Disable.
|
Note
After
you mail-enable a public folder the properties will change. If you
check a public folder that is not mail-enabled and one that is, you’ll
notice that they both still retain their Public Folder settings, but
the mail-enabled folder has settings that relate to email addresses,
mail flow, and so forth, just like a regular mailbox would.
PS Note
The
cmdlet through the Exchange Management Shell to mail-enable a public
folder is Enable-MailPublicFolder -Identity "\Name of Public Folder".
Configuring Public Folder Database Settings
Public
Folders can be managed as one entity under the database properties, or
individually as folders. Often you establish your settings at the
database level and not the folder level because it is easier to manage
in bulk.
You’ll notice that some of the settings are similar on the database level. To look at the properties, perform the following:
1. | Open the EMC.
|
2. | From the Navigation Tree, expand the Server Configuration work center and click Mailbox.
|
3. | From the Result pane, choose the server with your Public Folder database.
|
4. | In the Work pane, select the Public Folder database.
|
5. | Either right-click and choose Properties or select Properties from the Actions pane.
|
Note
that all the information on the General tab, including the maintenance
options, is the same as what we saw on the mailbox database earlier.
The Replication tab (shown in Figure 1) contains only a few settings:
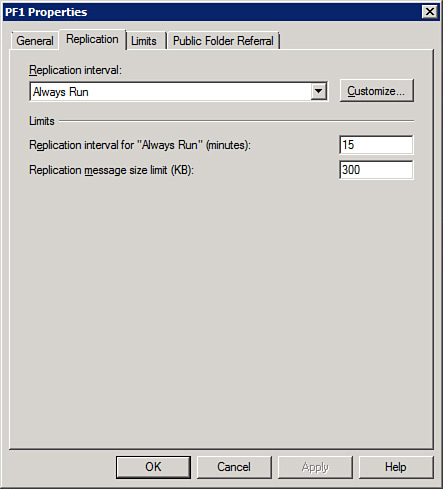
Replication
Interval determines when the replication of Public Folders occurs when
content updates are made. The default is for it to Always Run, but you
can turn it off completely or change the time frame, even customize the
replication schedule.
Replication Interval For “Always Run” (Minutes) shows the time interval that replication can occur.
Replication
Message Size Limit (KB) shows the size limit of a replication message.
Smaller items can be grouped together into a single replication
message, while larger ones are handled differently.
The Limits tab is slightly different from its mailbox database counterpart, as you can see in Figure 2.
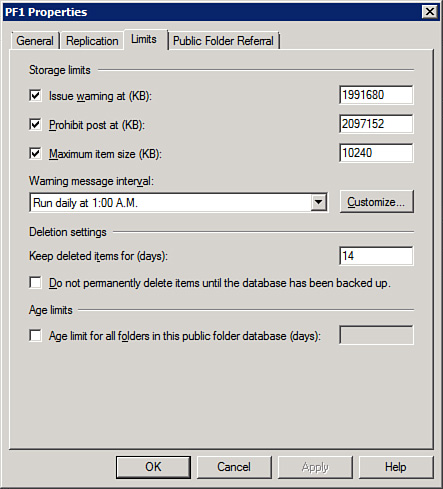
There
is a still a warning and prohibit limit. There is also a maximum item
size (KB) that prevents people from posting huge files to the public
folders (although you can adjust this depending on the need, but you
might find that it is better to adjust on a per folder basis, rather
than at a database level).
The
warning message interval works the same as it did for the mailbox
database. Notice that there is only a deleted item retention time (the
default is still 14 days) and the checkbox is still available for the
permanent deletion of items.
There
is an extra checkbox under the heading Age Limits. You select this
checkbox to limit the age of all folders in the database. You can set a
value of 0 to 24,855 days. After the items in the folder reach the
specified age, Exchange deletes them and frees up the space
automatically.
Note
The
big question you might have is why would you want to limit the age of a
public folder? Well, you might use a public folder for a variety of
reasons—perhaps to collect automated messages or spam. Or you might
simply want to ensure that, beyond a certain number of years, the age
limit is up.
The
final tab is the Public Folder Referral tab. Here you can do one of two
things: the default is to use Active Directory site costs, or you can
create a custom list to use.
The
purpose of this is to configure the folder replica that ultimately is
accessed by the client application. The way referrals work is that a
client tries to open a public folder and the server has to determine
where the contents should come from. Ordinarily, you have several
replicas of your public folders (although in a smaller environment you
might only have a single location). After the server determines the
best replica to offer, it gives the client a referral. If the replica
exists on the server itself, it uses the local replica; if not, it
tries to look in the same AD site (by default) unless you specify
otherwise on this tab.
Configuring Public Folder Settings
Public
Folder settings on individual folders require you to go back to the
Public Folder Management Console. Select the Default Public Folders,
and then look for the individual folder you wish to make changes to in
the Results pane. When you find the folder, select it, and click
Properties from the Actions pane.
You see three tabs:
General—
Shows you standard information such as the total number of items, the
size of the folder, when it was last modified, and so forth. There is
one checkbox, Maintain Per-user Read and Unread Information For This
Folder, which is selected by default. This enables a user to see
whether a message has been read or unread in Outlook.
Replication—
Here is where you can choose other servers, if you have them, to hold
replicas of your public folders. Imagine several branch offices around
the world that have people who want to access the same information. If
it all resides in one location, that creates extra traffic. However, if
you can create replicas in appropriate locations (not necessarily of
every folder if you don’t want or need to, but those that are more
interesting on the global level), it reduces traffic and improves
performance. You can adjust the replication schedule or simply go with
the one already established on the database. You can also determine a
local replica age limit (in days).
Limits—
This tab enables you to either use the database quota, item retention,
and age limits or choose to use a different set of limits on this
particular folder. You might decide a particular folder requires more
of a maximum item size for posts, depending on the content in it. You
might decide it requires a shorter age limit before content expires.
Whatever the case, you configure those limits here.